How to use Administrator mode to modify the GUI in FA Web Modules |
Administrator mode is available if you are assigned to a user group that has a check in the System administrator rights field on the Special Rights tab of System Mgmt -> Setup -> Access Rights -> User Groups screen.
To modify the user interface (UI) on Web Modules:
Step 1. Log on as an Administrator and right-click the logo or graphic in the top-right corner to activate Administrator mode.
The shortcut menu displays.
Step 2. Click Show UI Ctrl Info.
The system confirms that UI control is enabled.
Step 3. Click OK.
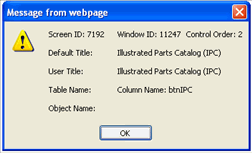
Step 4. Access the applicable page, hold down the Shift key, and click the button you want to modify.
A window displays the Screen and Window IDs, Control Order, Default Title, and User Title of the control. If appropriate, it also displays the Table Name and Object Name.

Step 5. Write down the screen ID, window ID, control order, default title, and user title and then click OK.
Step 6. In the GUI, go to System Management -> Setup -> Screen Launcher.
The Screen Launcher screen appears.
Step 7. Click
the Filter button ![]() ,
enter the screen ID, and click Get Data.
,
enter the screen ID, and click Get Data.
The Basic Info tab populates with the screen ID, default title, and user title of the applicable screen.
Step 8. Click the Launch the screen button.
The screen appears.
Step 9. Click
the down arrow next to the ![]() button and select Set User Group Control
Rights Template.
button and select Set User Group Control
Rights Template.
The UI Admin Session dialog box appears.
Step 10. In the User Group Control Rights Template field, specify the ID of the user group to which the user interface functionality will apply. This field has a list box.
Step 11. Click OK.
The next time that members of the specified user group access the screen, the control rights are in effect for the current session only.
Step 12. To
activate Administrator mode, click the ![]() button.
button.
Step 13. Right-click the field on the screen (or its label) that you want to change.
A shortcut menu appears.
Step 14. Select Modify Rights.
The Control Rights dialog box appears.
Step 15. Make changes as needed:
In the Deny View or Deny Update fields, insert or remove checks to specify whether users assigned to the user group can display and/or update the control.
In the More Info field, insert a check to highlight the field and indicate to users that it is required.
Step 16. Repeat steps 13 to 15 for each field that you want to change
Step 17. Click OK.
The next time that members of the specified user group access the screen, the control rights are in effect.
Step 18. To
exit Administrator mode, click the Stop
button ![]() .
.
Step 19. Exit the screen.