How to open a batch import template in Excel |
Once the import template file has been created, you can open it in Microsoft Excel to create a spreadsheet that you can then populate with data. The completed spreadsheet (import file) will include all records to be batch processed. You may include as many import files as you like, but they must be for only one screen and one transaction type.
Step 1. In Microsoft Excel, select File -> Open.
The Open dialog box appears.
Step 2. In the Files of type field, select All Files.
Note: Specify All Files to view all file types, not just those created in Excel.
Step 3. Navigate to the directory where the template is stored.
Step 4. Select the template and click Open.
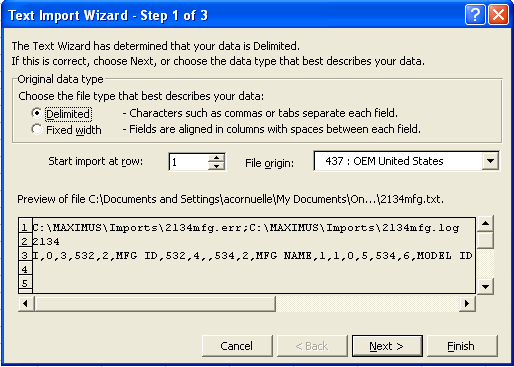
The Text Import Wizard - Step 1 of 3 dialog box appears.

The Wizard will help you convert the comma-separated import template text file into an Excel spreadsheet.
Step 5. Under Original data type, click the Delimited radio button.
Step 6. Click Next.
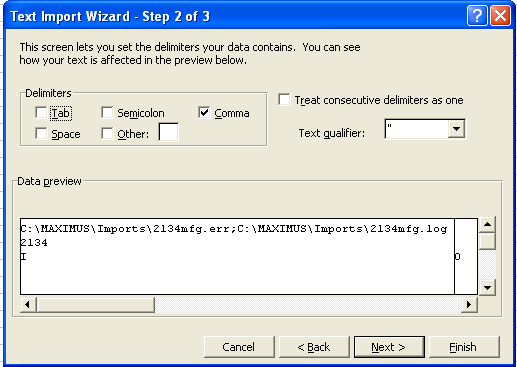
The Text Import Wizard - Step 2 of 3 dialog box appears.

Step 7. Under Delimiters, select the Comma check box and make sure all the other check boxes are blank.
Note: After you select the Comma check box, the Data preview box will display vertical lines between data elements. These lines will become columns in the spreadsheet.
Step 8. Click Next.
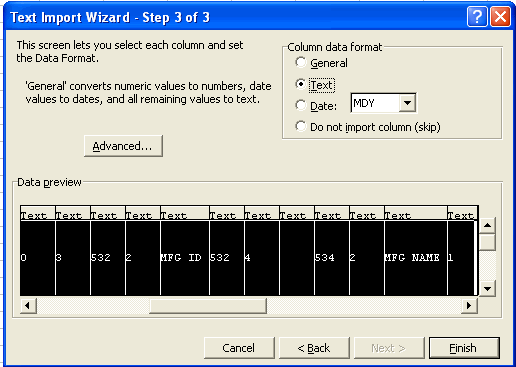
The Text Import Wizard - Step 3 of 3 dialog box appears.

Step 9. Highlight all columns in the Data preview box. (Click the first column, hold down the Shift key, then scroll to the last column and click on it.)
Step 10. Under Column data format, click the Text radio button.
Note: All data must be imported into the Excel file as text regardless of its format (i.e., numbers, dates).
Step 11. Click Finish.
The import template opens in an Excel spreadsheet.

Note that the column headings (e.g., MFG ID, MODEL ID) are preceded by a letter in column A and then a series of numbers. Also note how the column headings make it very obvious what type of data belongs in each column. For more information about the values included on the spreadsheet, go to the illustrated batch import template in Excel.
Step 12. If you are creating an insert file or a modify file, go to step 13. If you are creating a delete file, replace the M in cell A3 with a D.
Note: If you do not replace the M the system will modify the records rather than delete them.
Step 13. Populate the spreadsheet with the rest of the records you want included in the import file.
Sample illustration of a populated data import file in Excel:

Step 14. Save the file as both an .imp (import) and an .xls file.
Note: The .imp file will be used to create a command file. The .xls file will be used only if additional edits need to be made in Excel. Do not open the .imp file in Excel; the data will be reformatted.
Tip: Make sure to note where the file was saved. You may want to create a special directory structure specifically for batch processing files.
After you have populated the import file you can create a command file.
Next topic:
Previous topics:
_______________